
Did you ever wonder if you could use your camera as a motion detector to turn on your lights? Well … I’m going to tell you that you can and that it is pretty straight-forward as long as you already have the foundation of a smart-home setup. You’ll need a few things to get started, so let’s get right to it.
You’ll want:
- CanaKit Raspberry Pi 3 Complete Starter Kit – 32 GB Edition
- Philips Hue Starter Kit
- Foscam IP Camera
- A desktop PC running iSpy
Your Raspberry Pi should be setup to run Apache and PHP. This is where the webserver for your smart-home lives. In my example, http://my.home/, is the url I use to access my web application on my Raspberry Pi.
You’ll want to have a network camera already setup on your network. It doesn’t have to be the brand I linked above. Any network camera should work as long as you can connect to it in iSpy. I choose to run iSpy on my desktop computer as it is always running and fairly powerful. You might be able to run this application on other devices.
Once you get your camera added to iSpy, you’ll want to tweak the cameras “Motion Detection” settings to look something like below. I set a few detection zones on the camera where I would expect motion (I leave windows off of the detection areas because I didn’t want cars moving outside to trigger an alert). I also found that a trigger range of about 15-75 worked the best for me.
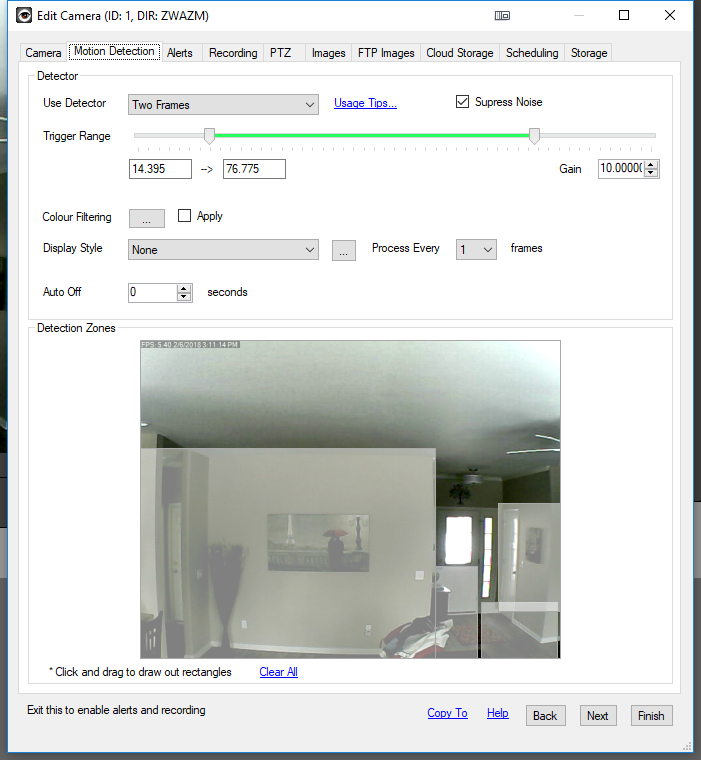
If it isn’t being triggered frequently enough or is too sensitive you may want to adjust your settings further.
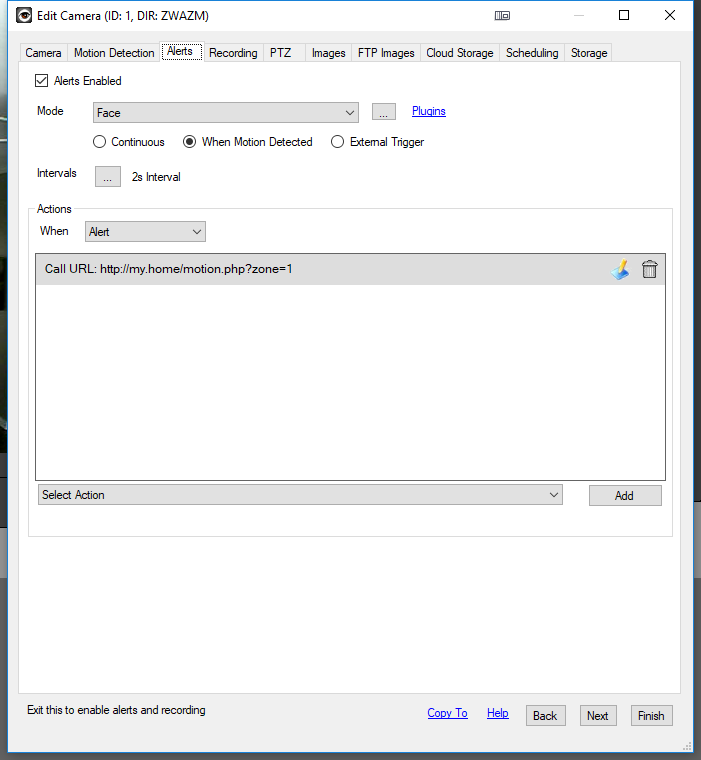
Next, Take a look at your “Alerts” settings. I downloaded the “Face” plugin so that the alert would only be triggered when a face was detected. Since my camera has infrared, when it automatically toggled from daytime and nighttime modes it triggered the motion detection. I feel like adding the face detection plugin improved upon this greatly. I added a call url to be triggered on the alert. This url is where the magic happens. The zone that I have specified in the url is actually the Philips Hue group id that I want to trigger on.
So what does the PHP look like to make this happen, you ask?
Well… first you are going to want to get an sdk loaded into your web app to make things easy. I recommend sqmk/Phue You can install it into your application with some command line:
composer require sqmk/Phue;
Once it is installed run the below from within the directory where this resides (substituting the IP address below with the IP address of your Philips Hue Bridge):
./bin/phue-create-user 10.0.0.23
Doing this will supply you with a token that you can use with the SDK.
That said, here is what my motion.php script looks like:
<?php
	$frm = $_REQUEST;

	$client = new \Phue\Client('10.0.0.23', 'secret_token');

	$groups = $client->getGroups();

	foreach ($client->getGroups() as $groupId => $group) {
		$status = $group->isOn();
		$lights["{$groupId}"] = $status;
	}

	if($presence->count > 0 && !$lights["{$frm['zone']}"]){

		//sunrise/sunset times
		$json = file_get_contents("https://api.sunrise-sunset.org/json?lat={$CFG->latitude}&lng={$CFG->longitude}");

		$array = json_decode($json, true);
		if(is_array($array)){
			$sunset = strtotime($array['results']['sunset']) + date("Z");
			$sunrise = strtotime($array['results']['sunrise']) + date("Z");
		}

		$time = strtotime(date("H:i:s"));

		if($time < $sunrise || $time > $sunset){


			if(is_object($groups["{$frm['zone']}"])){

				$group = $groups["{$frm['zone']}"];

				$group->setOn(!$current_state);

			}
		}
	}

?>
When the script is called from iSpy, it will turn on when it is during the night time hours and a face walks past the camera (which is setup in the same room as the light group). If you decide to keep the sunset/sunrise times, make sure you plug your longitude and latitude into the script (you can find this on google maps).
I hope you enjoyed and I hope this inspired you to create your own motion detector with iSpy.