Presence Detection for Automating Your Smart-Home

What do I mean by Presence Detection? Presence Detection is adding the ability to your system to detect a presence of someone or something either in your home or on your network. For my purposes I pretty much combine the two. The majority of us carry our smart phones with us everywhere we go so one could almost argue that the phone is just an extension of ourselves. I know this isn’t entirely true and sure someone could be in possession of someone else’s cellphone. For the sake of security you might not want to rely on it to automatically unlock your doors or something of that nature but at the same time… is it really any different than someone being in possession of a physical key to your house?

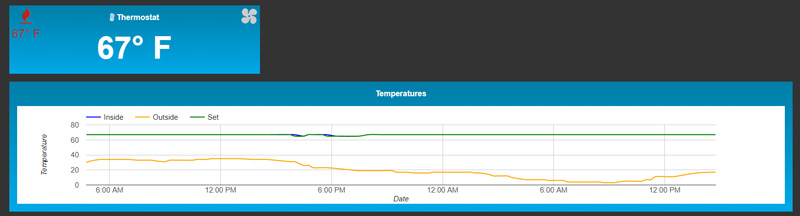
In my home I only rely on presence detection for a few different tasks. The first one is automating the HVAC system, setting different profiles when my wife or I are home. The second is turning off entertainment devices and lights when no one is home. But how exactly can you do this presence detection?

At the core, this is a super simple task. The first step was setting up a cron job on my Raspberry Pi to run every 5 minutes. This cron task runs an ARP scan on the network and saves the results to a text file.

sudo crontab -e;

Then add a record like this:

*/5 * * * * /usr/bin/arp-scan -l --ignoredups > /home/pi/presence.txt

If your network is anything like mine, you’ll end up with a large list of devices on your network. That’s ok, but to have meaningful presence detection you’ll probably want to identify your permanent devices vs your mobile devices. For example it wouldn’t be a good idea to base presence of someone in your house based on having a smart tv or blu-ray player attached to your network. These devices hopefully aren’t going anywhere.

One nice thing to note about the ARP scan, at least in my case, is that your phone can be connected to your network via VPN and it will not be included in the list.

The second main step of the process is setting a php cron script to parse the info and store it in a database to be used by your application. I setup the cron on the same schedule.

*/5 * * * * /usr/bin/php /path/to/your/script/log_presences.php

Let’s dissect what is in that script.

<?php
if(php_sapi_name() == "cli") { 
	$_SERVER['DOCUMENT_ROOT'] = dirname(dirname(__FILE__)) . "/web";
}

$sessions['enabled'] = false;
require_once("{$_SERVER['DOCUMENT_ROOT']}/../conf/config.php"); 

sleep(10);

$presence->get_data_from_file();

$qid = mysqli_query($dbh, "DELETE FROM `presence_log` WHERE DATE_SUB(NOW(), INTERVAL 24 HOUR) > `datetime`");

$presence->identify_people();

//merge the lists of watch list and mac addresses
$merged = array_merge($presence->mac_addresses, $presence->watch);

foreach($merged as $name => $mac){
	
	if(array_key_exists($mac, $presence->people)){
		//user is present
		$status = '1';
	}else{
		//user is not present
		$status = '0';
	}

	//print_r($name);
	//echo $status;


	$query = "
		INSERT INTO `presence_log` (
			`id`,
			`mac`,
			`datetime`,
			`status`
		) VALUES (
			NULL,
			'".mysqli_custom_escaper($mac, $dbh)."',
			NOW(),
			'".mysqli_custom_escaper($status, $dbh)."'
		)
	";

	$qid = mysqli_query($dbh, $query);

	$presence->poll_status($mac);

}


?>

First I import my standard config that holds the database connections, and various libraries. I add a sleep of 10 seconds for this script to offset the time it takes for the arp-scan to complete and log to the file. You could do without the sleep and just add a minute to your cron if you wanted. With the help of the presence class we obtain the data from the text file. We delete any old data from the log table and then parse the mac addresses looking for predefined “mobile” mac addresses.

To help show you what is going on, let’s have a look at the presence class.

<?php
class presence{
	public $count = 0;
	private $mac_addresses = array();
	public $people = [];
	public $watch = [
		"katie" => "aa:11:bb:22:cc:33",
		"shawn" => "ab:12:bc:23:cd:34",
		"chris" => "ee:11:dd:22:cc:33"
	];

	function __construct(){
		$this->who_is_here();
	}

	public function __get($name) { //allow read-access to private/protected properties
		return isset($this->$name) ? $this->$name : null;
	}
	
	function get_data_from_file(){
		$contents = file_get_contents("/home/pi/presence.txt");
		$matches = array();
		preg_match_all('/([a-fA-F0-9]{2}[:|\-]?){6}/m', $contents, $matches);
		
		$this->mac_addresses = $matches[0];
		$this->count = count($matches[0]);

		$this->remove_static_devices();

		//$this->identify_people();
	}

	function remove_static_devices(){
		$known = [
			"34:9d:93:be:d7:6e", //ROUTER
			"00:d1:60:9e:3d:78", //Chromecast
			"86:64:91:b8:6d:3e", //Blu-Ray
			"23:29:f9:a6:8d:3c", //GARAGE DOOR
		];

		if(is_array($known) && is_array($this->mac_addresses)){
			$flipped = array_flip($this->mac_addresses);

			foreach($known as $key => $value){


				if(array_key_exists($value, $flipped)){
					unset($flipped["{$value}"]);
				}

				
			}
			$this->mac_addresses = array_flip($flipped);
			$this->count = count($this->mac_addresses);
			
		}
	}

	function who_is_here(){
		global $CFG, $dbh;

		$query = "
			SELECT `mac` FROM `presence`
			WHERE `status` = '1'
		";

		$qid = mysqli_query($dbh, $query);
		$array = [];
		if($qid && mysqli_num_rows($qid)){
			$results = mysqli_custom_fetch_all($qid);
			foreach($results as $key => $value){
				$array[] = $value['mac'];
			}
		}

		$this->mac_addresses = $array;
		
		$this->identify_people();
		$this->count = count($this->people);

	}

	function identify_people(){
		$people = $this->watch;
		$named = array();

		if(is_array($this->mac_addresses)){
			$lookup = array_flip($people);

			foreach($this->mac_addresses as $key => $mac){

				if(array_key_exists($mac, $lookup)){
					$named["{$mac}"] = $lookup["{$mac}"];
				}else{
					//echo $mac;
					$named["{$mac}"] = "unknown";
				}
			}
		}

		$this->people = $named;
	}

	function poll_status($mac){ //check to see current status
		global $CFG, $dbh;

		$query = "
			SELECT * FROM `presence` 
			WHERE `mac` = '".mysqli_custom_escaper($mac, $dbh)."'
			LIMIT 1
		";

		$qid = mysqli_query($dbh, $query);
		if($qid && mysqli_num_rows($qid)){
			$current = mysqli_fetch_assoc($qid);
		}

		if(!is_array($current)){
			$current['status'] = 0;
			$current['mac'] = $mac;
		}


		$query = "
			SELECT * FROM `presence_log`
			WHERE `mac` = '".mysqli_custom_escaper($mac, $dbh)."' 
			ORDER BY `datetime` DESC
			LIMIT 3
		";

		$qid = mysqli_query($dbh, $query);

		if($qid && mysqli_num_rows($qid)){
			$results = mysqli_custom_fetch_all($qid);
		}else{
			$results[0]['status'] = 0;
		}


		//if status = 1: reflect immediately
		if($results[0]['status'] == 1 && $current['status'] !== $results[0]['status']){
			$qid = mysqli_query($dbh, "REPLACE INTO `presence` (`mac`, `datetime`, `status`) VALUES ('".mysqli_custom_escaper($current['mac'], $dbh)."', NOW(), '".mysqli_custom_escaper($results[0]['status'], $dbh)."')");
			//$this->trigger_hook($results[0]['status']);
		}


		//if status = 0: check to see how many polls were missed 
		$all_missed = true;
		if(is_array($results)){
			foreach($results as $key => $value){
				if($value['status'] == 1){
					$all_missed = false;
				}
			}
		}

		if($all_missed == true && $results[0]['status'] == 0 && $current['status'] !== $results[0]['status']){
			$qid = mysqli_query($dbh, "REPLACE INTO `presence` (`mac`, `datetime`, `status`) VALUES ('".mysqli_custom_escaper($current['mac'], $dbh)."', NOW(), '".mysqli_custom_escaper($results[0]['status'], $dbh)."')");
			//$this->trigger_hook($results[0]['status']);
		}


	}

	function trigger_hook($status){
		
		if($status == 0){ //triggered when no one is here.
			
			//Turn off all the lights
			$client = new \Phue\Client('ip_here', 'secret_key_here');
			foreach ($client->getLights() as $lightId => $light) {
				$light->setOn(false);
			}


		}else{ //triggered when someone is here.


		}
	}

	//automate a coffeemaker when activity for a user starts up in the morning?
	// tie to the person's alarm clock app? can that be done?
	function likes_coffee($person){

	}


}

?>

The mac addresses in the above example are all fictitious and randomly generated. When the class is called we run the who_is_here method to find out what mac addresses have a status logged as 1 (for present). We run them by the identify_people method which contains a statically defined list of known mobile mac addresses. In this case you would add your known mobile mac addresses to the array. There are a couple extras I accounted for with this class such as “trigger_hook” and “likes_coffee” as brainstorming some ideas about automatically adding in hooks based on status changes or potentially someday automating a coffee brew when someones alarm goes off on their phone, but only in cases where the person likes coffee, of course.

The get_data_from_file method essentially reads the contents of the text file that arp-scan generates. It parses the mac addresses out of it. Once it has a list of all mac addresses we run the remove_static_devices method to remove known static devices. Any device that isn’t matched to a known person will automatically be logged as an “unknown person”. This lets us better monitor when friends join the network and will give us a chance to identify them/manually add them to our known list.

This will give you the added benefit of knowing when your friends arrive at your house in the event you are gone and want to let them in remotely.

Asking Google Assistant When Your Spouse Will Be Home

Not that the intent is to be “Big Brother” or anything like that, but I recently setup up Google Assistant to tell me the approximate number of minutes my spouse is away from home. Why would anyone want this? People might ask if we don’t trust each other and think that we only want to check up on each other. Really that is the farthest from the truth. I love my wife and have complete trust in her.

In our relationship it is really just a logistical thing. My wife works different schedules so comes home at different times, usually leaving a little late. I sometimes will get home a little late as well. When one of us gets home before the other we like to cook dinner for each other. But how do we know when to start dinner? Or how do we gauge when dinner should roughly be finished so that it finishes about when they are supposed to be home? We could just call each other. And we do. But sometimes one of us is talking to someone else or maybe there are times we don’t want to bother one another. Who wants to hear your significant other demanding to know when you’ll be home everyday?

So how does one ask Google Assistant when your spouse will be home?

Well… hopefully you have some programming knowledge. Also hopefully you have an Android phone.

What You’ll Want

  • Android Phone
  • Tasker installed on aforementioned phone
  • An endpoint url with HTTPS
  • An account on DialogFlow

Putting it Together

I’ll be honest. This was my first project on DialogFlow. I started experimenting with it when it was api.api, but struggled a bit with trying to get things started. I forgot about it for maybe about 6 months and thought I’d take a second look.

Install Tasker

Install Tasker on the phones that you want to track.

Create a Profile and call it “TrackLocation” using the Time context. Remove the “From” and “Until” by tapping on each. Then set “Every” to 10 minutes, or whatever your preference is.

Now create the task that will run with the profile. For the first Action use “Get Location”

Set the source to Any and set the timeout lower (I used 12 seconds) so that if you can’t get the location it isn’t going to drain your battery. You can also prevent it from getting the location again if it already recently updated. Now, Set an “if” conditional using (%TIMES – %LOCTMS) > 1000 ( substitute in your own choice for the number of seconds since the last update.

For the 2nd action of the task set it to an HTTP Post (found in the NET category). Use the url endpoint that you designated for this. Under Data/File use a json representation of the data that you want to POST. I use 3 different things: “zone”, “loc”, and “name”. You can probably just use 2 loc and name. For me zone can be “home”, “work” or “public” which is just a variable that gets set depending on what wifi network I’m on (or not on). Make sure to also set your content type to “application/json”.

Set Up Your Endpoint

Here you really have the freedom to use whatever language you want. I’m most comfortable with PHP so that is what I use. So in my text editor I have saved something that looks about like this for the filename /service/location.php:

$input = file_get_contents('php://input');
if(isJson($input)){
	$data = json_decode($input, true);
}

if($data['loc'] && $data['zone'] && $data['name']){

	$arr = explode(',', $data['loc']);
	if(is_array($arr) && array_key_exists("0", $arr)){
		$lat = $arr[0];
	}else{
		$lat = 0;
	}
	
	if(is_array($arr) && array_key_exists("1", $arr)){
		$lon = $arr[1];
	}else{
		$lon = 0;
	}


	$query = "
		INSERT INTO 
		`locs` (
		            `id`,
		            `stamp`,
		            `zone`,
		            `latitude`,
		            `longitude`,
		            `name`
		) VALUES (
			NULL,
			NOW(),
			'".$data['zone']."',
			'".$lat."',
			'".$lon."',
			'".$data['name')."'
		)
	";

	mysqli_query($dbh, $query);

}

This is a basic example, and doesn’t match with how I’ve done things entirely because I use my own internal database functions. I just wanted to provide an example showing the data being saved to a database table. Now that the data is being stored, run some tests in Tasker or wait until the next poll to see if the data is being inserted. If it is you can consider moving on to the next part.

Creating Your App in DialogFlow

Go to dialogflow.com, creating and account if you have not already. Then “Go to Console”. Create a new project. Under the “Fulfillment” settings on the left specify a url on the same domain that you’d like to handle your communications with Google Assistant. Use any authentication or headers that you’d like. Now click save.

Go to Entities in the left. Create one for “person” or “people” whatever you want to call it. This is going to act as a variable for the person’s name.

Go to “Intents” next and create a new one called “How far away is spouse” or similar name. Fill in different ways to say the same things. Highlight where the variables are in each phrase and set them to match what they are. In my example I’ve attempted to get the device location, but so far I haven’t been successful in really getting that piece to work. So while it is in my example I’ve statically define the latitude and longitude of my house.

Make sure you check “Use Webhook” for the fulfilment option and I would also check “End Conversation” under the Google Assistant options, otherwise you’ll be stuck within the scope of your app in Google Assistant unless you tell Assistant to “cancel” or otherwise break out of the app.

That should be the basics of the communication that you’ll have with Assistant. Next go to the integrations section on the left. And manage settings for the Google Assistant integration. Then “Manage Assistant App”. Name your app something meaningful to you. To communicate with it you’ll need to say “Hey Google, talk to [App Name]” or “Hey Google, Ask [App Name] [action or question]”. Your App does not need to be published for you to be able to communicate with it. You’ll have sandbox access to your own apps. I do not recommend publishing an app that you only intend to use personally, especially something like this where personal info is involved.

Setting Up Your Assistant Endpoint

The final step is setting up the webhook endpoint. This url is where the communication happens between your server and google assistant. I’d recommend getting the output of the POST request initially so that you can see what it looks like. Next you should setup some case statements to look at different intentId’s so that this endpoint url can handle all of the conversations for your app.

Once that is done you’ll want to read the last location of the particular person that you are querying. You can setup whatever language/pronouns you want but the end goal will be to use Google’s Distance Matrix api to calculate the distance/time.

$person = strtolower($params['People']);
$location = strtolower($params['location']);

switch(strtolower($person)){
	case "sean":
	case "shawn":
	case "shaun":
		$person = "Shawn";
		$gender_pronoun = "he";

	break;
	case "katie":
		$person = "Katie";
		$gender_pronoun = "she";

	break;

}


$lat = "[insert home lat here]"
$long = "[insert home long here]"


//get last known location for user
$qid = mysqli_query($dbh, "
	SELECT * 
	FROM `locs`
	WHERE `name` = '$person' 
	ORDER BY `stamp` DESC
	LIMIT 1
");

if($qid){
	$last_known = mysqli_fetch_array($qid);
}

if(is_array($last_known)){
	switch(strtolower($last_known['zone'])){
		case "home";
			$response['speech'] = "{$person} is home.";
		break;
		case "work";	
			$distance = getDrivingDistance($lat, $long, $last_known['latitude'], $last_known['longitude']);
			$response['speech'] = "{$person} is at work. If {$gender_pronoun} left right now {$gender_pronoun} would be home in about {$distance['time']}";
		break;
		case "public";	
			$distance = getDrivingDistance($lat, $long, $last_known['latitude'], $last_known['longitude']);


			$response['speech'] = "{$person} is {$distance['time']} from you.";

			if(($distance['value'] / 60) <= 3){
				$response['speech'] = "{$person} is here.";
			}
		break;
		default:
			$distance = getDrivingDistance($lat, $long, $last_known['latitude'], $last_known['longitude']);
			$response['speech'] = "{$person} is {$distance['time']} from you.";

			if(($distance['value'] / 60) <= 3){ $response['speech'] = "{$person} is here."; } break; } }else{ $response = [ "speech" => "I'm not sure where {$person} is."
	];

}

header('Content-type: application/json');
echo json_encode($response);

The getDrivingDistance function definition looks something like this:

function getDrivingDistance($lat1, $long1, $lat2, $long2){
	$url = "https://maps.googleapis.com/maps/api/distancematrix/json?origins=".$lat1.",".$long1."&destinations=".$lat2.",".$long2."&mode=driving&language=en-US&units=imperial&key=[insert key here]";
	$ch = curl_init();
	curl_setopt($ch, CURLOPT_URL, $url);
	curl_setopt($ch, CURLOPT_RETURNTRANSFER, 1);
	curl_setopt($ch, CURLOPT_SSL_VERIFYHOST, 0);
	curl_setopt($ch, CURLOPT_SSL_VERIFYPEER, 0);
	$response = curl_exec($ch);
	curl_close($ch);
	$res = json_decode($response, true);
	$dist = $res['rows'][0]['elements'][0]['distance']['text'];
	$time = $res['rows'][0]['elements'][0]['duration']['text'];
	$value = $res['rows'][0]['elements'][0]['duration']['value'];

	return array('distance' => $dist, 'time' => $time, 'value' => $value);
}

With any luck now you should be able to ask Google where your spouse is. Be sure to add shortcuts in the google home app if you don’t want to add the part where you “ask [app name]” or “talk to [app name]”. Once the shorcut is established, you can speak to Google a little more naturally.

Hope this helps!

My thermostat automatically adjusts when I’m away

photo of fireplace

So how can you automate your thermostat? You’ll need a wifi connected thermostat at the very least. I have an older model Honeywell that connects to mytotalconnectcomfort.com. You’ll also need to think about what rules you want to define when creating your own auto HVAC rules.

What Do I Mean by Auto HVAC Rules?

Simply put, what do you want to happen when certain criteria is met? If it is colder than X in the house, do you want the thermostat to kick on at a certain temperature until it reaches that temperature? (This is a pretty poor example, because this is already what a thermostat is designed to do. To make something a little more effective you are going to want to add a couple variables.)

Start by Defining Your Plan

Create a plan on paper. It might not be your final plan. You may end up tweaking it a few times after you roll with it. But at least have some clear goals in mind ahead of time so that you can write the basic structure of your program. I live in an area that has cold winters and hot summers. It can also fluctuate between cold and hot in a single day. I hate having to control things if I can help it. Why do I need to switch the system from A/C to Heat or vice versa? I just want it to stay a certain temperature in my house. Why does my thermostat have to be so complicated to make me choose which system I want to use? I know part of the problem has to do with outdoor temperatures. You don’t want your A/C kicking on in the dead of winter for example. But we have ways of getting the outdoor temperature. Shouldn’t that be enough to drive which system to use? I think so.

My Plan

I decided to setup 2 different profiles so to speak. Profile “Home” and Profile “Away”.

Profile “Home” would be activated when someone is home. Basically I know when household members are home by doing some presence detection. I’ll outline specifically how I tackle the presence detection at a later date. But the short version is that I do a network scan looking for mac addresses of cell phones on my home network. Android Oreo has become great about always making sure I’m on my home wifi that I really don’t ever have to worry about a thing.

Home Profile

When the temperature outside is 60° F or higher,
and the temperature inside is 68° F or higher
and the cool set point is above 68° F
I make sure the system is set to AC and the cool set point is set to 68° F. This means in warmer weather my house should never be above 68 if someone is home.

On the other end of the spectrum…
When the temperature outside is 46° F or lower,
and the temperature inside is 65° F or lower
and the heat set point is lower than 67° F
I make sure the system is set to Heat and the heat set point is set to 67° F. This means that in cold weather my house will never be below 67 when someone is home.

So what about the away profile? This is where I try to save a little money. This probably doesn’t amount to a lot as I only change it a few degrees. But I like to keep the temperature close enough to my preferred temperatures when I get home so that it doesn’t really take long to get back to my comfort level.

Away Profile

When the temperature outside is 60° F or higher,
and the cool set point is NOT 74° F
I make sure the system is set to AC and the cool set point is set to 74° F. This means in warmer weather my house should never be above 74 if someone is no one is home.

When the temperature outside is 46° F or lower,
and the heat set point is NOT 65° F
I make sure the system is set to Heat and the heat set point is set to 65° F. This means that in cold weather my house will never be below 65 when no one is home.

So How Do I Do All This?

I setup a PHP cron script on my raspberry pi to run every 15 minutes. It performs a few sanity checks to make sure nothing weird is being reported by the API. It runs the profiles and then it logs the data to a database so that I have a complete picture of all the events.

For my project I downloaded an unofficial api here:
https://github.com/cjmaio/honeywell-tcc-api

Then I put together a cron script that looks something like this to run every 15 minutes:

$honeywell->login();
$thermostat = $honeywell->checkStatus();

if(is_array($thermostat)){

	//print_r($thermostat);

	$temp['outside'] = $thermostat['latestData']['uiData']['OutdoorTemperature'];
	$temp['inside'] = $thermostat['latestData']['uiData']['DispTemperature'];
	$coolSetPoint = $thermostat['latestData']['uiData']['CoolSetpoint'];
	$heatSetPoint = $thermostat['latestData']['uiData']['HeatSetpoint'];
	$current_mode = $thermostat['latestData']['uiData']['SystemSwitchPosition'];

	if($current_mode == 1){
		$set = $heatSetPoint;
	}else{
		$set = $coolSetPoint;
	}

	//sanity checks
	if($temp['outside'] > 110 || $temp['outside'] < -40){
		die("Outside temperature out of range");
	}

	if($temp['inside'] > 90 || $temp['inside'] < 50){
		die("Inside temperature out of range");
	}

	if($temp['outside'] == 0 && $temp['inside'] == 0){
		die("0 temperature?");
	}

	if($presence->count > 0){

		if($temp['outside'] >= 60 && $temp['inside'] >= 68 && $coolSetPoint > 68 ){ //set the AC for 68
			$honeywell->setThermostat(3);
			$honeywell->setCoolTemperature(68);
		}elseif($temp['outside'] <= 46 && $temp['inside'] <= 65 && $heatSetPoint < 67){ //set the Heat for 67
			$honeywell->setThermostat(1);
			$honeywell->setHeatTemperature(67);
		}
		

	}else{ //no one is home

		if($temp['outside'] >= 60 && $coolSetPoint !== 74){ //set the AC for 74
			$honeywell->setThermostat(3);
			$honeywell->setCoolTemperature(74);
		}elseif($temp['outside'] <= 46 && $heatSetPoint !== 65){ //set the Heat for 65
			$honeywell->setThermostat(1);
			$honeywell->setHeatTemperature(65);
		}
		
	}


	$query = "
		INSERT INTO `hvac_log` (
			`id`,
			`datetime`,
			`tinside`,
			`toutside`,
			`mode`,
			`setpoint`
		) VALUES (
			NULL,
			NOW(),
			'".db_escape_string($temp['inside'], $CFG->write_dbh['site'])."',
			'".db_escape_string($temp['outside'], $CFG->write_dbh['site'])."',
			'".db_escape_string($current_mode, $CFG->write_dbh['site'])."',
			'".db_escape_string($set, $CFG->write_dbh['site'])."'
		)
	";

	$qid = db_query($query, $CFG->write_dbh['site']);
}

I use my own database functions so you can omit the logging section if you want or revise it to suit your needs. I just wanted to demonstrate the data that I do log to give you an idea how it fits together in my charting. What kind of auto HVAC rules would you write?


Harmony and Google Home

Linking your Harmony and Google Home is pretty straight forward.

All you have to do is tap the hamburger menu in the Google Home app.
Then “Explore” and search for Harmony. Tap on Harmony and then tap Link. That’s it!

But how can you make the most out of your interactions with Harmony and Google Home?

I’ve never been a fan of first asking the Google Home to “Ask Harmony” to do something. It feels a little clunky. I’ve heard that Google is taking steps away to reduce some of the “ask xxx” to perform an action but until then I recommend simply using the Google Home app on your phone and setting up shortcuts.

Instead of saying “Hey google, ask harmony to turn on the tv” you can transform it into “hey google, turn on the tv.”

Much more concise and much more natural. You’ll have Harmony and Google Home playing extra nice together.

Here’s how to do it:

1. Open the Google Home app on your smart form
2. Tap the hamburger menu in the upper left
3. Tap More settings

Then scroll down to “Shortcuts”. Update: This may now be called “Routines”.

You’ll add a new one, by tapping the blue plus icon in the lower right and you will get a screen that looks something like this:
Harmony and Google Home

As you can see I’ve added multiple phrases that will trigger the google home to turn off the TV. I recommend setting up a few to accomplish the task.
“Hey, Google. Turn off the TV” or “Hey, Google, shut off the tv” will both do the same thing.

Take a look at a few other shortcuts I’ve setup.

You can ask Harmony to start an activity that you have defined in the harmony app with “Hey Google, ask Harmony to Start [activity name]”

By default Harmony should also come with an internal command of “PowerOff” so you can say “Hey Google, ask Harmony to power off” and it will shut down the activity/all devices connected to your harmony hub.


What are some of your favorite ways to interact with Harmony through your Google Home?

Switching to Project Fi

Photo of android phone

Many people are unsure about switching to Project Fi. They are big data spenders. They think the cost is too high. Google makes them nervous.

About a year ago I found myself paying too much on Verizon Wireless. I was a long time customer of nearly 8 years. Why was I paying nearly $100 a month for myself?

Part of the problem was that I liked my data. A lot. I’d stream music, download games, and browse reddit all of the time while connected to data. I was being irresponsible. Each month I’d use about 5gb worth of data which meant that I needed to be on the 6gb plan so that I wasn’t paying a premium for the data I used.

Then I heard about Project Fi. It was just $25 a month for the phone service and then $10 per GB. I figured that even if I used the same amount of data, I would still be coming out slightly ahead. So why not switch? Plus I was drawn in with the international pricing. The ability to continue using my phone while overseas without having to get a new SIM card or get an add-on for my existing service AND pay the same rate for data. That is pretty unheard of! I don’t travel abroad very much, but the last time I did I didn’t have service at all. Having this built into the plan just gives extra peace of mind!

Once I switched to Project Fi something interesting started to happen. I made it a game to see how little data I could use. Paying for data as I went was exciting because of the savings I might see. I would connect to Wifi everywhere. I’d connect to public hotspots. I’d make sure xfinitywifi was in my connection list so that it’d autoconnect if I was out of the house and there was one nearby. I created my own VPN to filter out ads to save just slightly more on my data.

The first month I was down to only using 2GB. Then 1GB. Now each month I’m down to about .5GB per month. My habits completely changed after switching to Fi. I’d have all my Spotify playlists downloaded in case I wanted to listen to music while I was in the car. Overall I’m completely satisfied with the service. There were a couple instances where there were some random quirks like the caller id being messed up and calls appearing from another number or where I’d receive duplicate texts. But for such a low monthly price for myself I can’t complain.

If you are on the fence about switching to Project Fi, and think maybe that you use too much data … just give it some thought. Your habits might change too when you can making saving money into a game!

Check out Project Fi!


Making your own Smart-Home

smart-home dashboard

I encourage those that are just starting out with creating their own smart-homes to not only look at out-of-the-box solutions, but to also customize their own solution. Customizing and making it your own will not only help you get exactly what you want, but it will also give you a great sense of accomplishment. It doesn’t necessarily have to be complicated. It can be as complex as you want it to be. The great thing about customizing is that you can purchase parts individually. You don’t have to go “all-in” and spend all your money up-front. Just add individual pieces as you see fit and tailor them to your needs as you go.

Must Haves:

These products don’t necessarily have to be on your list. However, I consider them essentials in my own circumstance.

Laying the Foundation

If your house isn’t already wired for Ethernet, I strongly recommend it before building your smart-home. Wireless is always improving, but a wired connection will always be a step or 2 above that. A smart-home is not an area where you want to skimp on reliability. I purchased a new home in Fall of 2017. Unfortunately, it was not wired for Ethernet. But at least I was fortunate to have a wife who agreed to me hiring out some help to get the wiring job done. While I had the knowledge to do the wiring myself, it was nice to have someone willing to go up to the attic, have tools to get the job done efficiently, and help me with the drops.

The contractor agreed to let me purchase my own materials, so I did, because I knew exactly what I wanted and wanted to have some control over the pricing of the parts. He also agreed to let me help terminate the cables.

If you would like to know more about this read: Wiring your home for ethernet.

Creating a Central Hub

I purchased a Raspberry Pi to act as the central management for the smart home. You could repurpose a computer that you already have in your house for this. But where the Pi excels is in its power usage. The maximum that it will use is 5W. This is 12 times less than a conventional light bulb! This is great for a device that I always want to be on.


Once I got the Raspberry Pi setup, I put a few essentials in place such as:

  • Pi-Hole Advertisement Blocker for network wide ad blocking
  • Open VPN to be able to connect my phone to my network when not at home. This gave my phone the benefit of the adblocking and allows me to control smart home devices securely and remotely (I forgot to mention… my web app is intentionally not setup on a public url, so VPN is required).

Then I started a webserver to host my main application. Pi-Hole starts a lighthttpd server by default, but I’ve always been accustomed to working in Apache so I removed lighthttpd and installed Apache and PHP.

I setup a cronjob to run every 15 minutes. This cron handles a multitude of tasks. I check the network ARP table during this poll to see what devices are connected. I use this to find non-permanent devices on the network (mobile devices). This gives me an idea of who in the family is “home” right now. This is a form of “presence” detection. This means that when people are home I can set my smart home to perform certain actions or when everyone is gone I can have other actions performed.

With this presence detection I have fully automated my HVAC system. It monitors the temperature outside, the temperature inside, and the number of people home. If it is cold outside and no one is home, I drop the thermostat by a few degrees. Or in the summer, I raise it a few degrees. When people are home it is set to a comfortable level. This level of monitoring also means that I never have to set the thermostat to “heat” or to “cool”. It knows the temperature outside and reacts accordingly.

I don’t stop at HVAC though. Some people in the household often forget to turn out the lights when they leave… So I tied some energy saving into the system. When the presence changes from any number to 0, a couple commands are sent across the network to turn off all of the lights and turn off any entertainment devices connected to my Harmony Hub.

The Lights

I decided on the Philips Hue lights because I knew they had support with the Google Home and Harmony Hub. Setup was pretty straight foward. You screw in the light bulbs in the sockets where you want them. Turn on the lights. Plug in/connect the harmony hub and then push the button on the hub. You can download an app on your phone to manage the lights.


I used an open source app on Github to connect to my lights and allow for easy integration. Before your PHP app can connect to the lights you have to make sure you run bin/phue-create-user to create a unique token. Then within my cron script I setup something that looks like this:

if($presence->count == 0 && $last['count'] >= 1 && $this['count'] == 0){

	//turn off the lights
	$client = new \Phue\Client('10.0.0.23', '[secret key]');
	foreach ($client->getLights() as $lightId => $light) {
		$light->setOn(false);
	}

	//Turn off all harmony connected devices
	$activity = new activity("10.0.0.21");
	$activity->run("PowerOff");
}

Remember that this cron runs every 15 minutes. So what we end up with here is that when everyone is gone the lights all turn off and the Harmony Hub connected devices all turn off.

I also created an interface using a floorplan I found from my home builder’s website. I had to trace the floorplan in Illustrator as it was a jpg and I wanted to convert it into a scaleable SVG graphic that would work responsively.

Here’s an example of what things look like when the lights are off:
Light off

Here’s what they look like with lights on in 3 of the rooms:
Light on

The web app retrieves the light status every 10 seconds in case lights are manually turned on or triggered via another mechanism so that the status is accurate. Tapping or clicking on a room will either toggle the lights on or off.

With Google Home, I can say “Turn off all the lights”, “turn on the lights in the office”, or “turn off the bedroom lights” and within seconds the lights will respond. This has been great for when I’m already laying in bed and want to turn the lights off.

I topped things off by setting up motion detection on the ip camera in the living room. I use iSpy on my desktop PC and monitor motion/face detection. ISpy can be setup to call a url on motion detection. I get the sunset/sunrise times in my area via api and turn on the living room light when the above criteria is met and it is “night time”. This means that I don’t have to fumble around in the dark or buy a motion sensor to acheive these results. I imagine a motion sensor would be a little more fluid, however my solution works fine for me.

The code for that looks something like this (triggered on motion):

$frm = $_REQUEST;

$client = new \Phue\Client('10.0.0.23', '[secret key]');

$groups = $client->getGroups(); 

foreach ($client->getGroups() as $groupId => $group) {
	$status = $group->isOn();
	$lights["{$groupId}"] = $status;
}

if($presence->count > 0 && !$lights["{$frm['zone']}"]){

	//sunrise/sunset times
	$json = file_get_contents("https://api.sunrise-sunset.org/json?lat={$CFG->latitude}&lng={$CFG->longitude}");

	$array = json_decode($json, true);
	if(is_array($array)){
		$sunset = strtotime($array['results']['sunset']) + date("Z");
		$sunrise = strtotime($array['results']['sunrise']) + date("Z");
	}	
	
	$time = strtotime(date("H:i:s"));

	if($time < $sunrise || $time > $sunset){


		if(is_object($groups["{$frm['zone']}"])){

			$group = $groups["{$frm['zone']}"];
			
			$group->setOn(!$current_state);

		}
	}
}

The Thermostat

My house came with the thermostat listed above. So I had one smart-home item that I didn’t need to purchase!

I think if I did have to make that purchase I would have ended up with the Nest Thermostat. They have same basic features and I don’t want to shell out any more money for the Nest Learning feature. But it would have been something I probably would have appreciated had I not already had a solution. Some of the newer model Honeywells have an API that you can tie into, others use a web address “total connect comfort” where you can control the thermostat online. Though there are some unofficial APIs on GitHub that you could look into to automate if you did have one of the earlier models.

Using an API, I log the temperatures into a nice chart every 15 minutes and set various rules regarding the auto HVAC. As you can see on the chart below the green line indicates what the thermostat is set to. This example is in the winter. The thermostat is normally set to 67 when we are home or 65 when we have left. In this screenshot there was an example where we left and came back a couple times.

I’m hoping that by also charting all of this information I can get a feel for when the furnace or A/C is no longer running as efficiently as it used to which may either indicate HVAC problems or insulation problems. Knowledge is power.

Conclusion

You can spend a lot of time customizing your new smart house. Automating is just one way you can turn your home into a well-oiled machine. Your only limitation is your own imagination.

Do you have any smart-home ideas? Do you need help setting something up?


Wiring your home for Ethernet

Photo of closed cabinet
Photo of rack mounted equipment, ethernet ports on switch connected to patch panel
I’m astounded that homes are still being built today without ethernet. I think there is still a large population out there that doesn’t know what it is or don’t know why they need it. All homes are wired with coaxial, but many are not wired with ethernet. I’ve always preferred a wired connection over wireless for the stability and speed. It is also just a little bit more secure. I’d never want to get rid of my wireless altogether but I prefer a hybrid network where both coexist. I’m going to discuss some of the products I purchased to help accomplish the task. Your needs may vary.

Hardware:

Cost Estimate:

  • Labor: $550
  • Hardware: $310
  • Router/Switch: $500
  • Total: $1360

If you already have your own router and/or switch you can save some money here. The cost estimate above assumes you have nothing. Your mileage on labor might also vary depending on your location and contractors in your area.

In fall of 2017 I purchased a new home. Unfortunately it was not wired how I wanted it. In college I minored in networking, so I had knowledge of terminating connections and making my own ethernet cables. I thought I wanted to tackle it myself until I went up into the attic. There was insulation everywhere. How would I find the walls and drill the holes where I needed them? Did I have the right tools? I decided I would hire someone to help me out. The contractor agreed to let me order my own parts and help terminate at the walls, saving them a little time and me a little money.

Photo of gangplate with 2 ethernet ports and 1 coaxial

Prior to wiring I had my ISP come out to setup a fiber obtic ONT in the garage. Because the garage is well insulated enough I thought it would be ok to act as a wiring closet. My only worry about the environment was dust and dirt blowing in when the garage door opens, but I sweep the garage very regularly so this would help things. I still didn’t want my fancy new router in the garage because that would hurt the wireless signal. It was also a larger investment than my other networking hardware so I wanted to protect it a little more.

The switch I’ve had laying around for a while. It was a rack mountable switch, even though I didn’t have a rack previously. This comes in handy for this task because I decided to purchase a small cabinet to house my devices and keep them protected.

I went with CAT6 as my standard, because I wanted this to last a long time. I decided to use a patch panel, because if I ever needed to replace the switch I can swap it out without fear of damaging cables. The patch cables don’t need to last long. Also I thought it would come in handy if I ever wanted to move things around the house. Perhaps I wanted to move the router to a different room. Or maybe I wanted to create segmented networks. I don’t have a big house, but I do like to have some flexibilty. I don’t know what types of devices I’ll have in the future.

I purchased 1000ft of cabling. That was enough to cover my 1600 sq. foot house how I needed it. We ran 4 cables to a living room gang plate, 4 cables to the office, 2 in the guest bedroom, and 2 in the master bedroom. So that only covers half of my switch. I figured that would leave a little more room to expand or add devices to the cabinet.

Once the wiring was complete and all the ports tested out, I tossed a Raspberry Pi in, to act as a controller for my new Smart Home project. I also put a Liftmaster Internet Gateway in the cabinet so that I could control my garage door with my Smart Phone.

Using your camera as a motion detector for your lights

Did you ever wonder if you could use your camera as a motion detector to turn on your lights? Well … I’m going to tell you that you can and that it is pretty straight-forward as long as you already have the foundation of a smart-home setup. You’ll need a few things to get started, so let’s get right to it.

You’ll want:

Your Raspberry Pi should be setup to run Apache and PHP. This is where the webserver for your smart-home lives. In my example, http://my.home/, is the url I use to access my web application on my Raspberry Pi.

You’ll want to have a network camera already setup on your network. It doesn’t have to be the brand I linked above. Any network camera should work as long as you can connect to it in iSpy. I choose to run iSpy on my desktop computer as it is always running and fairly powerful. You might be able to run this application on other devices.

Once you get your camera added to iSpy, you’ll want to tweak the cameras “Motion Detection” settings to look something like below. I set a few detection zones on the camera where I would expect motion (I leave windows off of the detection areas because I didn’t want cars moving outside to trigger an alert). I also found that a trigger range of about 15-75 worked the best for me.

If it isn’t being triggered frequently enough or is too sensitive you may want to adjust your settings further.

Next, Take a look at your “Alerts” settings. I downloaded the “Face” plugin so that the alert would only be triggered when a face was detected. Since my camera has infrared, when it automatically toggled from daytime and nighttime modes it triggered the motion detection. I feel like adding the face detection plugin improved upon this greatly. I added a call url to be triggered on the alert. This url is where the magic happens. The zone that I have specified in the url is actually the Philips Hue group id that I want to trigger on.

iSpy Screenshot of Alert settings

So what does the PHP look like to make this happen, you ask?

Well… first you are going to want to get an sdk loaded into your web app to make things easy. I recommend sqmk/Phue You can install it into your application with some command line:

composer require sqmk/Phue;

Once it is installed run the below from within the directory where this resides (substituting the IP address below with the IP address of your Philips Hue Bridge):

./bin/phue-create-user 10.0.0.23

Doing this will supply you with a token that you can use with the SDK.

That said, here is what my motion.php script looks like:

<?php
	$frm = $_REQUEST;

	$client = new \Phue\Client('10.0.0.23', 'secret_token');

	$groups = $client->getGroups(); 

	foreach ($client->getGroups() as $groupId => $group) {
		$status = $group->isOn();
		$lights["{$groupId}"] = $status;
	}

	if($presence->count > 0 && !$lights["{$frm['zone']}"]){

		//sunrise/sunset times
		$json = file_get_contents("https://api.sunrise-sunset.org/json?lat={$CFG->latitude}&lng={$CFG->longitude}");
	
		$array = json_decode($json, true);
		if(is_array($array)){
			$sunset = strtotime($array['results']['sunset']) + date("Z");
			$sunrise = strtotime($array['results']['sunrise']) + date("Z");
		}	
		
		$time = strtotime(date("H:i:s"));

		if($time < $sunrise || $time > $sunset){


			if(is_object($groups["{$frm['zone']}"])){

				$group = $groups["{$frm['zone']}"];
				
				$group->setOn(!$current_state);

			}
		}
	}

?>

When the script is called from iSpy, it will turn on when it is during the night time hours and a face walks past the camera (which is setup in the same room as the light group). If you decide to keep the sunset/sunrise times, make sure you plug your longitude and latitude into the script (you can find this on google maps).

I hope you enjoyed and I hope this inspired you to create your own motion detector with iSpy.