
I encourage those that are just starting out with creating their own smart-homes to not only look at out-of-the-box solutions, but to also customize their own solution. Customizing and making it your own will not only help you get exactly what you want, but it will also give you a great sense of accomplishment. It doesn’t necessarily have to be complicated. It can be as complex as you want it to be. The great thing about customizing is that you can purchase parts individually. You don’t have to go “all-in” and spend all your money up-front. Just add individual pieces as you see fit and tailor them to your needs as you go.
Must Haves:
- CanaKit Raspberry Pi 3 Complete Starter Kit – 32 GB Edition
- Philips Hue Starter Kit
- Liftmaster Internet Gateway
- Google Home / Google Home Mini / Google Chromecast Audio
- Google Chromecast
- Logitech Harmony Hub
- Foscam IP Camera
- Honeywell Thermostat
These products don’t necessarily have to be on your list. However, I consider them essentials in my own circumstance.
Laying the Foundation
If your house isn’t already wired for Ethernet, I strongly recommend it before building your smart-home. Wireless is always improving, but a wired connection will always be a step or 2 above that. A smart-home is not an area where you want to skimp on reliability. I purchased a new home in Fall of 2017. Unfortunately, it was not wired for Ethernet. But at least I was fortunate to have a wife who agreed to me hiring out some help to get the wiring job done. While I had the knowledge to do the wiring myself, it was nice to have someone willing to go up to the attic, have tools to get the job done efficiently, and help me with the drops.
The contractor agreed to let me purchase my own materials, so I did, because I knew exactly what I wanted and wanted to have some control over the pricing of the parts. He also agreed to let me help terminate the cables.
If you would like to know more about this read: Wiring your home for ethernet.
Creating a Central Hub
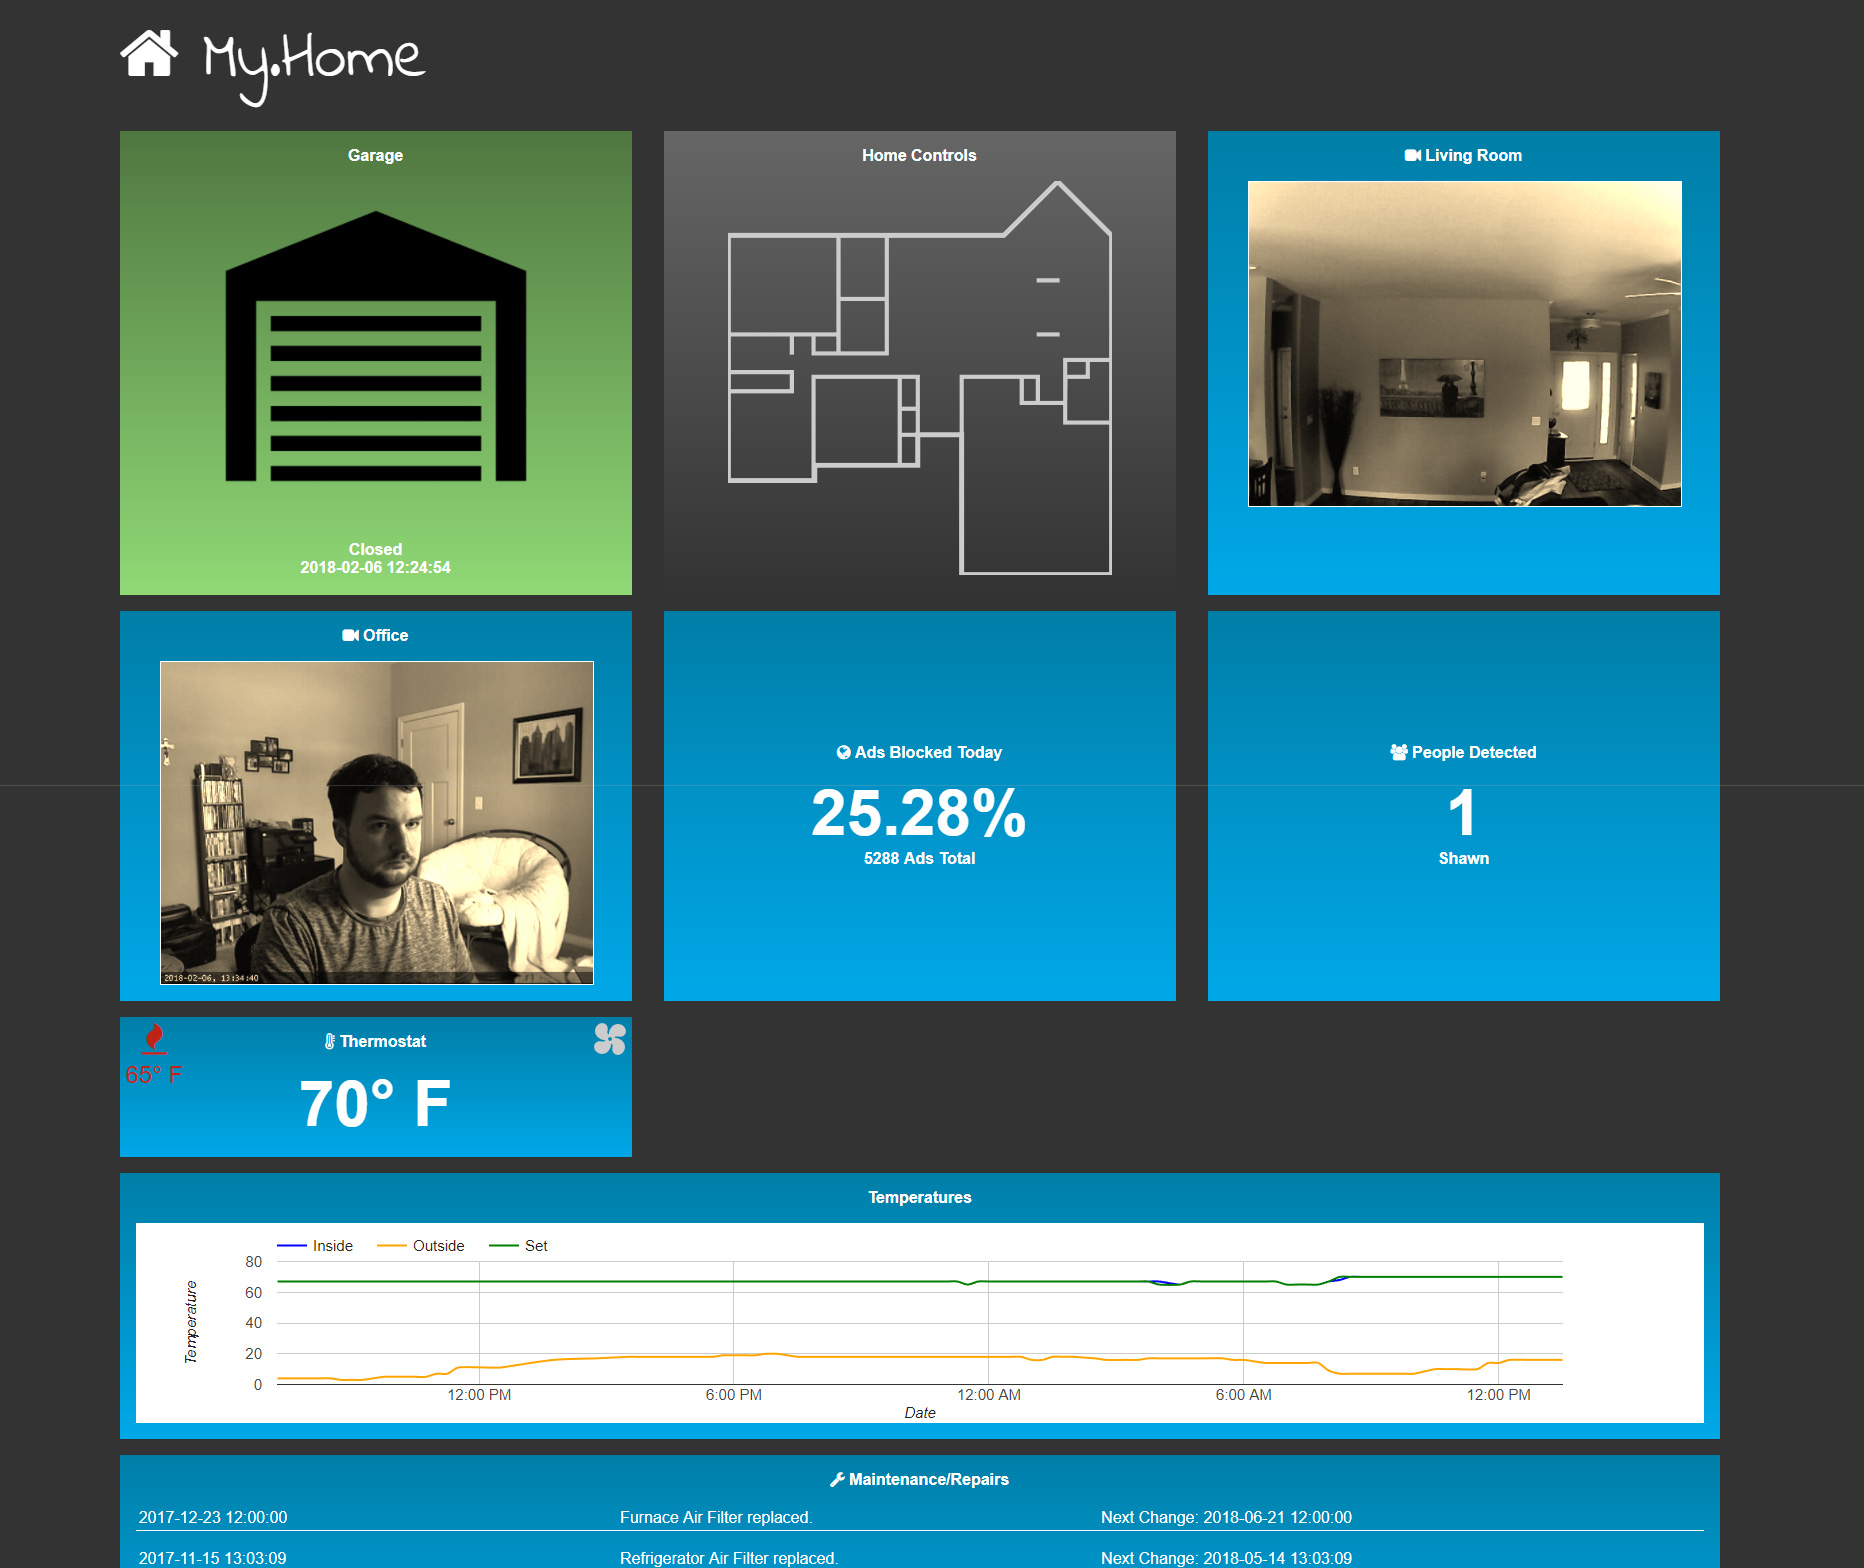
I purchased a Raspberry Pi to act as the central management for the smart home. You could repurpose a computer that you already have in your house for this. But where the Pi excels is in its power usage. The maximum that it will use is 5W. This is 12 times less than a conventional light bulb! This is great for a device that I always want to be on.
Once I got the Raspberry Pi setup, I put a few essentials in place such as:
- Pi-Hole Advertisement Blocker for network wide ad blocking
- Open VPN to be able to connect my phone to my network when not at home. This gave my phone the benefit of the adblocking and allows me to control smart home devices securely and remotely (I forgot to mention… my web app is intentionally not setup on a public url, so VPN is required).
Then I started a webserver to host my main application. Pi-Hole starts a lighthttpd server by default, but I’ve always been accustomed to working in Apache so I removed lighthttpd and installed Apache and PHP.
I setup a cronjob to run every 15 minutes. This cron handles a multitude of tasks. I check the network ARP table during this poll to see what devices are connected. I use this to find non-permanent devices on the network (mobile devices). This gives me an idea of who in the family is “home” right now. This is a form of “presence” detection. This means that when people are home I can set my smart home to perform certain actions or when everyone is gone I can have other actions performed.
With this presence detection I have fully automated my HVAC system. It monitors the temperature outside, the temperature inside, and the number of people home. If it is cold outside and no one is home, I drop the thermostat by a few degrees. Or in the summer, I raise it a few degrees. When people are home it is set to a comfortable level. This level of monitoring also means that I never have to set the thermostat to “heat” or to “cool”. It knows the temperature outside and reacts accordingly.
I don’t stop at HVAC though. Some people in the household often forget to turn out the lights when they leave… So I tied some energy saving into the system. When the presence changes from any number to 0, a couple commands are sent across the network to turn off all of the lights and turn off any entertainment devices connected to my Harmony Hub.
The Lights
I decided on the Philips Hue lights because I knew they had support with the Google Home and Harmony Hub. Setup was pretty straight foward. You screw in the light bulbs in the sockets where you want them. Turn on the lights. Plug in/connect the harmony hub and then push the button on the hub. You can download an app on your phone to manage the lights.
I used an open source app on Github to connect to my lights and allow for easy integration. Before your PHP app can connect to the lights you have to make sure you run bin/phue-create-user to create a unique token. Then within my cron script I setup something that looks like this:
if($presence->count == 0 && $last['count'] >= 1 && $this['count'] == 0){

	//turn off the lights
	$client = new \Phue\Client('10.0.0.23', '[secret key]');
	foreach ($client->getLights() as $lightId => $light) {
		$light->setOn(false);
	}

	//Turn off all harmony connected devices
	$activity = new activity("10.0.0.21");
	$activity->run("PowerOff");
}
Remember that this cron runs every 15 minutes. So what we end up with here is that when everyone is gone the lights all turn off and the Harmony Hub connected devices all turn off.
I also created an interface using a floorplan I found from my home builder’s website. I had to trace the floorplan in Illustrator as it was a jpg and I wanted to convert it into a scaleable SVG graphic that would work responsively.
Here’s an example of what things look like when the lights are off:
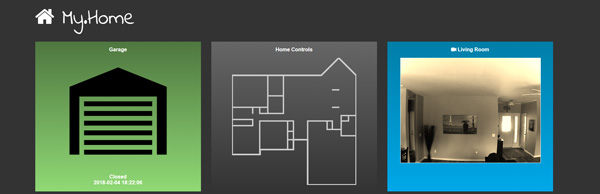
Here’s what they look like with lights on in 3 of the rooms:
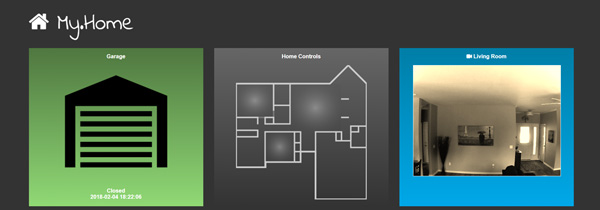
The web app retrieves the light status every 10 seconds in case lights are manually turned on or triggered via another mechanism so that the status is accurate. Tapping or clicking on a room will either toggle the lights on or off.
With Google Home, I can say “Turn off all the lights”, “turn on the lights in the office”, or “turn off the bedroom lights” and within seconds the lights will respond. This has been great for when I’m already laying in bed and want to turn the lights off.
I topped things off by setting up motion detection on the ip camera in the living room. I use iSpy on my desktop PC and monitor motion/face detection. ISpy can be setup to call a url on motion detection. I get the sunset/sunrise times in my area via api and turn on the living room light when the above criteria is met and it is “night time”. This means that I don’t have to fumble around in the dark or buy a motion sensor to acheive these results. I imagine a motion sensor would be a little more fluid, however my solution works fine for me.
The code for that looks something like this (triggered on motion):
$frm = $_REQUEST;

$client = new \Phue\Client('10.0.0.23', '[secret key]');

$groups = $client->getGroups();

foreach ($client->getGroups() as $groupId => $group) {
	$status = $group->isOn();
	$lights["{$groupId}"] = $status;
}

if($presence->count > 0 && !$lights["{$frm['zone']}"]){

	//sunrise/sunset times
	$json = file_get_contents("https://api.sunrise-sunset.org/json?lat={$CFG->latitude}&lng={$CFG->longitude}");

	$array = json_decode($json, true);
	if(is_array($array)){
		$sunset = strtotime($array['results']['sunset']) + date("Z");
		$sunrise = strtotime($array['results']['sunrise']) + date("Z");
	}

	$time = strtotime(date("H:i:s"));

	if($time < $sunrise || $time > $sunset){


		if(is_object($groups["{$frm['zone']}"])){

			$group = $groups["{$frm['zone']}"];

			$group->setOn(!$current_state);

		}
	}
}
The Thermostat
My house came with the thermostat listed above. So I had one smart-home item that I didn’t need to purchase!
I think if I did have to make that purchase I would have ended up with the Nest Thermostat. They have same basic features and I don’t want to shell out any more money for the Nest Learning feature. But it would have been something I probably would have appreciated had I not already had a solution. Some of the newer model Honeywells have an API that you can tie into, others use a web address “total connect comfort” where you can control the thermostat online. Though there are some unofficial APIs on GitHub that you could look into to automate if you did have one of the earlier models.
Using an API, I log the temperatures into a nice chart every 15 minutes and set various rules regarding the auto HVAC. As you can see on the chart below the green line indicates what the thermostat is set to. This example is in the winter. The thermostat is normally set to 67 when we are home or 65 when we have left. In this screenshot there was an example where we left and came back a couple times.
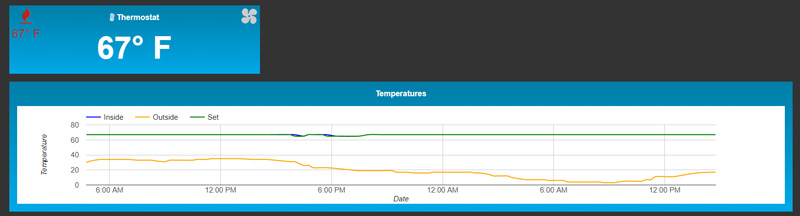
I’m hoping that by also charting all of this information I can get a feel for when the furnace or A/C is no longer running as efficiently as it used to which may either indicate HVAC problems or insulation problems. Knowledge is power.
Conclusion
You can spend a lot of time customizing your new smart house. Automating is just one way you can turn your home into a well-oiled machine. Your only limitation is your own imagination.
Do you have any smart-home ideas? Do you need help setting something up?